Here's a quick post...
In the previous post I mention the Light Box I used to shoot pictures of my latest sculpture.
It was really easy to make, only required a bit of planning and materials.
White Corregated plastic for the walls, picked up at the local hardware store.
Rice paper for the side windows. (I used what I had on hand which was chinese calligraphy paper, which I will most definitely blog about later on....;) Just taped over square opening cut in the side walls.
The lights were inexpensive construction style lights also picked up at hardware stores. Shouldn't cost you more than about 15 bucks each.(Can$) Try princess auto, they have sales periodically...
Just taped together with clear packaging tape. (use clear, as opaque will show as dark spots on the inside of the box.)
IMPORTANT. the lights are EXTREMELY HOT I turn them off if I leave the room, and keep them AWAY from the PLASTIC and RICE PAPER. DUH! If you make a light box don't burn your house down ok?
Why is it so big? So I can photograph lots of different things in it. As it's just shy of 2 x 2 feet square, it makes my sculpture look tiny! Trust me, the sculpture isn't tiny, the dimensions are shown in my last post.
Cheers!
Peace and Balance
~ the art ninja ~
Sunday, December 17, 2006
Jenna, the Resin Cast.
I've finally gotten a chance to build a light box for shooting photos of my Sculpture ~ Jenna ~
Here's the Final Sculpture.
This sculpture has been cast with a black tint added to the resin before it's mixed, this causes it to turn out grey when the resin kicks.
(kicks = the chemical reaction starts causing the molecules to change from liquid to solid. It also turns white, and it happens very fast, hence the term "kick")
I think I prefer casting the figure in white. I wanted to try the grey too see how it turned out.

 In the two side profile shots you can see the seam line on the figure. It's actually fairly thin, with a small amount of flash showing. (flash = thin amounts of a casting's material that has seeped into the parting seam between the two mold halves. )
Cleanup recommendations:
A good small file for filing down any abnormalities in the seam line.
Some 400 or 800 grit sandpaper. (sanding wet works wonders too)
I like to use a dremel to clean up the base but you don't necessairly need one, some elbow grease and an exacto knife will work. Make sure you cut AWAY from yourself, your hands, your fingers. You WILL jab yourself WHEN you slip. That's not an IF it's a WHEN. (Take my advice on this one... I've jabbed myself too many times to not insist you follow my advice!)
Dimensions:
The figure measures approximately 5.3cm x 9cm x 5.5cm OR 3.75" x 2.5" x 2.25"
Painting:
For wonderful instruction on painting figures and various painting techniques, go to any Games Workshop store in person. They always have people willing to help you get started and you can also pick up supplies there. (a bit more expensive then some other places but it's all in one place)
Also try a google search for miniature painting. You'll find a tonne of advice. I plan on putting up a painted copy of the figure in the future so you can see one solution to the painting question...
do something creative!
~the art ninja~
Monday, October 02, 2006
The Making of Jenna - Building the Mold.
In a previous post... drawings-and-such I'd mentioned another sculpture...This is that other sculpture...
Here's my official CYA statement. Before you do anything at all with RTV Silicone, Casting Resin or any other hazardous chemicals be damn sure you have the correct protection and follow the correct safety procedures while handling the material. All chemicals you buy should have available safety precaution data sheets. I'd suggest reading them thoroughly and don't dare deviate from the recommendations. Playing roulette with your health isn't a good idea. Don't blame me if you splash casting resin in your eye and it hardens before you can say boo. I always work with protective goggles, full respirator, lots of paper towels on hand and a new pair of latex gloves. Don't get lazy and don't try to save a buck by cutting back on protective gear. If you seriously want to get into casting, you're going to be spending a few hundred bucks at least to get the proper equipment and RTV silicone will run you about 30 bucks for half a litre. (there's over one litre in the mold below)
Welcome to the making of "Jenna"
Jenna is the name I gave to the sculpture you'll see below in this step by step mold making process. If you're interested in sculpting and casting, this step-by-step will give you a great headstart on one way to go about it. When I created the mold for Jenna, I had already had the experience of using RTV silicone many times before. I've also got 3+ years of casting research under my belt. I'd suggest that my process here is not the final be all and end all of mold creation as you will need to do your own research and find out all you can before you start. Then once you've answered all your own questions you should try casting something you're not too attached to as a test. No amount of reading will take the place of honest-to-goodness experience. You're gonna break a few eggs before you're able to make a good omelet...as they say. Just don't rush it and break you're prize dodo bird eggs before you know what you're doing.
Well, This should really be called "The Casting of Jenna" As I didn't take any progress shots of the sculpting process on this one. (I promise I will take great in sculpting progress shots of the next one...)
Making the mold.
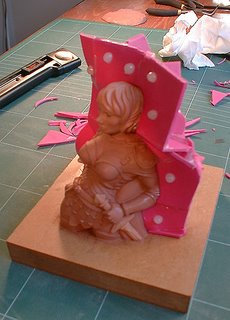 In this shot you'll see the first half mold support structure which I built from sheets of craft foam. The back is built up using a hotglue gun, and slowly but surely, pieces of foam have been added to completely isolate one half of the sculpture. I've placed glue pips on the side which will create keys to hold the mold halves together better. You'll see what I mean later on. In order to completely seal the parting line edge to prevent the mold material from leaking through to the back, when the support walls are complete I then carefully painted a layer of vaseline along the edge to plug up all the holes.
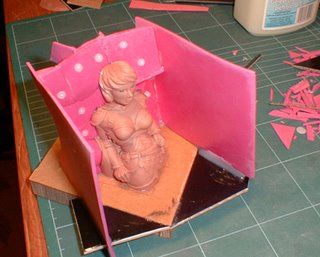 I've added the two side walls, Only the top wall to be attached then pouring starts below...
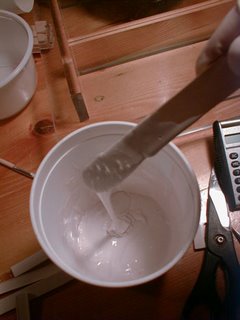 After the support structure is built to isolate half of the sculpture, I mix up a batch of RTV silicone. Catalyst is poured into the liquid RTV which will cause the silicone to set within 24 hours. Mixing introduces lots of air into the silicone as you can see from the image. After it is mixed thoroughly...
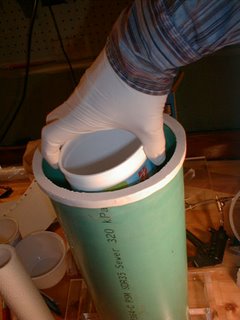
...I place the RTV into a vacuum chamber. Vacuuming it pulls the air bubbles out of the mixture leaving a clean and bubble-free batch of silicone ready for careful pouring.
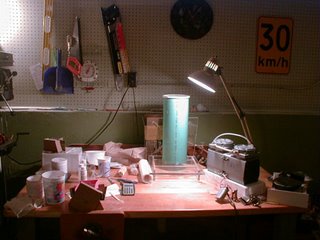
The Casting Station.
This is where I do all my casting. On a big table in a space that can get messy. In a well ventelated garage (I still use the respirator). See the road speed sign on the side? When casting, I follow it.... Work slowly and carefully and you'll screw up much less and save money. Vacuum chambe in the centre, vacuum pump to the right of that.
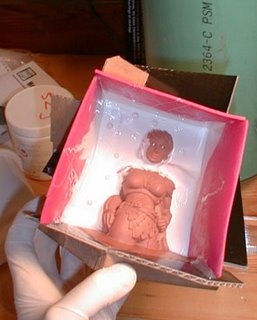 I poured the first half of the mold in 2 stages. This first pour was done this way so that I could get a thin layer of silicone to seal any gaps which I might have missed along the edge of the figure. Even so, I discovered after that there was in-fact a thin gap through which silicone leaked. If I had poured the entire side at once, I would have lost a lot of silicone through that gap. The mold was left to set for 24 hours at this stage.
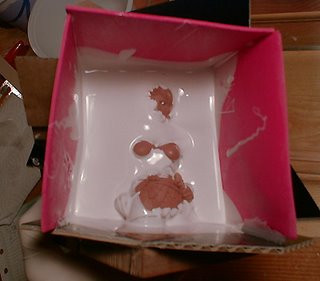 This shows the second stage of the First pour. In order to avoid trapping air against the various surfaces of the sculpture, I pour the silicon into one corner of the foam "box" and allow it to VERY SLOWLY flow over the surface of the sculpture. If I was to carelessly just dump the whole batch of RTV into the box it would trap air which I do not want to happen.
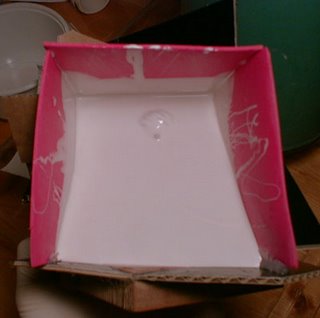 The First pour almost finished. The entire sculpture is now covered. I added more silicone after this shot to make sure that the final mold would be thick enough to hold its shape when casting.
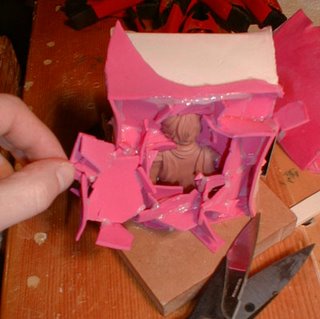 After the silicone sets for 24 hours I pull off the finely crafted foam "box" taking care not to damage the sculpture or cause the RTV to come away from the figure. I need it to stay exactly where it is in order to build the second half of the mold.
 Here's the cleaned half mold...You can see the divots created by the hotglue pips added at the beginning.
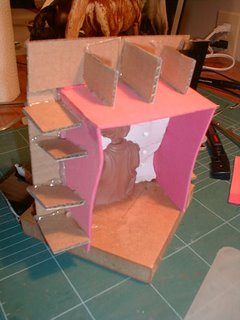 Fast forward a bit...I've built the walls for the second half of the mold. Reinforced with cardboard to keep it from coming away from the completed sides.
The most important step... I applied vaseline to the entire exposed surface of silicone. If this step is forgotten, the new silicone will CHEMICALLY BOND with the first side and you'll have a big block of silicone that you can't pull apart. That's bad. Very bad.
All set to pour.
I mixed up a new batch of RTV for this side going through the same vacuuming and pouring process as for the first side.
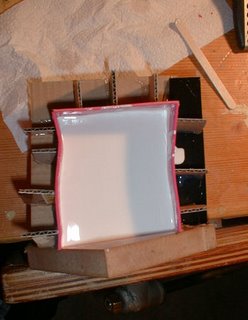 Here's the final pour. Time to wait another 24 hours...
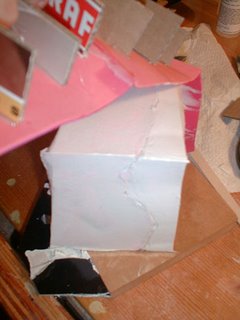 After it's set, the box comes a way easily. We're left with a solid block with parting line along the side.

The cleaned up and completed mold with sculpture embedded inside.
 The moment of truth. The mold opened. The sides came away easily (because of the vaseline used as mold release) Looks clean, no bubbles and the sculpture looks to be intact!
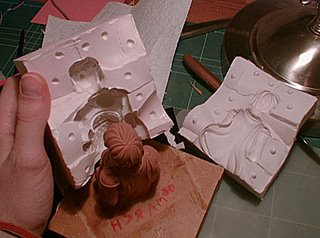 Carefully I pulled the front half of the mold off the sculpture. The silicone is extremely flexible and is great for casting sculptures with undercuts. It comes away without much complaining.
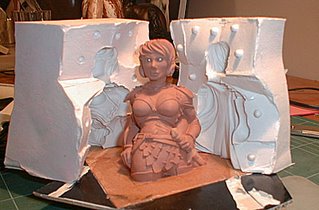 Here it is, the final shot. Clean mold ready for casting and an undamaged clay sculpture ready to be used to make a new mold if need be!
Hope you learned something.... about casting today!
Here's what it took me to to get to this point:
6 days of constructing, pouring and waiting!
3 years of research, buying equipment, building, testing and learning!
50 hours of sculpting!
Peace and Balance - and happy casting!
~The Art Ninja~
"You don't have to be great to get started, you do have to start to become great"
Here's my official CYA statement. Before you do anything at all with RTV Silicone, Casting Resin or any other hazardous chemicals be damn sure you have the correct protection and follow the correct safety procedures while handling the material. All chemicals you buy should have available safety precaution data sheets. I'd suggest reading them thoroughly and don't dare deviate from the recommendations. Playing roulette with your health isn't a good idea. Don't blame me if you splash casting resin in your eye and it hardens before you can say boo. I always work with protective goggles, full respirator, lots of paper towels on hand and a new pair of latex gloves. Don't get lazy and don't try to save a buck by cutting back on protective gear. If you seriously want to get into casting, you're going to be spending a few hundred bucks at least to get the proper equipment and RTV silicone will run you about 30 bucks for half a litre. (there's over one litre in the mold below)
Welcome to the making of "Jenna"
Jenna is the name I gave to the sculpture you'll see below in this step by step mold making process. If you're interested in sculpting and casting, this step-by-step will give you a great headstart on one way to go about it. When I created the mold for Jenna, I had already had the experience of using RTV silicone many times before. I've also got 3+ years of casting research under my belt. I'd suggest that my process here is not the final be all and end all of mold creation as you will need to do your own research and find out all you can before you start. Then once you've answered all your own questions you should try casting something you're not too attached to as a test. No amount of reading will take the place of honest-to-goodness experience. You're gonna break a few eggs before you're able to make a good omelet...as they say. Just don't rush it and break you're prize dodo bird eggs before you know what you're doing.
Well, This should really be called "The Casting of Jenna" As I didn't take any progress shots of the sculpting process on this one. (I promise I will take great in sculpting progress shots of the next one...)
Making the mold.
 In this shot you'll see the first half mold support structure which I built from sheets of craft foam. The back is built up using a hotglue gun, and slowly but surely, pieces of foam have been added to completely isolate one half of the sculpture. I've placed glue pips on the side which will create keys to hold the mold halves together better. You'll see what I mean later on. In order to completely seal the parting line edge to prevent the mold material from leaking through to the back, when the support walls are complete I then carefully painted a layer of vaseline along the edge to plug up all the holes.
 I've added the two side walls, Only the top wall to be attached then pouring starts below...
 After the support structure is built to isolate half of the sculpture, I mix up a batch of RTV silicone. Catalyst is poured into the liquid RTV which will cause the silicone to set within 24 hours. Mixing introduces lots of air into the silicone as you can see from the image. After it is mixed thoroughly...
...I place the RTV into a vacuum chamber. Vacuuming it pulls the air bubbles out of the mixture leaving a clean and bubble-free batch of silicone ready for careful pouring.

The Casting Station.
This is where I do all my casting. On a big table in a space that can get messy. In a well ventelated garage (I still use the respirator). See the road speed sign on the side? When casting, I follow it.... Work slowly and carefully and you'll screw up much less and save money. Vacuum chambe in the centre, vacuum pump to the right of that.
 I poured the first half of the mold in 2 stages. This first pour was done this way so that I could get a thin layer of silicone to seal any gaps which I might have missed along the edge of the figure. Even so, I discovered after that there was in-fact a thin gap through which silicone leaked. If I had poured the entire side at once, I would have lost a lot of silicone through that gap. The mold was left to set for 24 hours at this stage.
 This shows the second stage of the First pour. In order to avoid trapping air against the various surfaces of the sculpture, I pour the silicon into one corner of the foam "box" and allow it to VERY SLOWLY flow over the surface of the sculpture. If I was to carelessly just dump the whole batch of RTV into the box it would trap air which I do not want to happen.
 The First pour almost finished. The entire sculpture is now covered. I added more silicone after this shot to make sure that the final mold would be thick enough to hold its shape when casting.
 After the silicone sets for 24 hours I pull off the finely crafted foam "box" taking care not to damage the sculpture or cause the RTV to come away from the figure. I need it to stay exactly where it is in order to build the second half of the mold.
 Here's the cleaned half mold...You can see the divots created by the hotglue pips added at the beginning.
 Fast forward a bit...I've built the walls for the second half of the mold. Reinforced with cardboard to keep it from coming away from the completed sides.
The most important step... I applied vaseline to the entire exposed surface of silicone. If this step is forgotten, the new silicone will CHEMICALLY BOND with the first side and you'll have a big block of silicone that you can't pull apart. That's bad. Very bad.
All set to pour.
I mixed up a new batch of RTV for this side going through the same vacuuming and pouring process as for the first side.
 Here's the final pour. Time to wait another 24 hours...
 After it's set, the box comes a way easily. We're left with a solid block with parting line along the side.
The cleaned up and completed mold with sculpture embedded inside.
 The moment of truth. The mold opened. The sides came away easily (because of the vaseline used as mold release) Looks clean, no bubbles and the sculpture looks to be intact!
 Carefully I pulled the front half of the mold off the sculpture. The silicone is extremely flexible and is great for casting sculptures with undercuts. It comes away without much complaining.
 Here it is, the final shot. Clean mold ready for casting and an undamaged clay sculpture ready to be used to make a new mold if need be!
Hope you learned something.... about casting today!
Here's what it took me to to get to this point:
6 days of constructing, pouring and waiting!
3 years of research, buying equipment, building, testing and learning!
50 hours of sculpting!
Peace and Balance - and happy casting!
~The Art Ninja~
"You don't have to be great to get started, you do have to start to become great"
Saturday, September 02, 2006
Artists that Inspire
I was recently given a book for my birthday from my better half and I wanted to mention it here. This is really just a shameless plug for a great artist. An artist that inspires me not only through their awesome painting skills but also for their willingness to share their excitment they have for their craft with others.
"Brom" as he is known in the fantasy art world has been creating really awesome works of art as far back as I can remember. He really got his kick in the industry when he started painting for TSR back in the day.
The book I received is called "The Plucker" It's an illustrated novel. Hardcover (first printing) 145 pages of fantastic story (ie: fantasy but not dragons and orks style fantasy) Filled with awesome paintings and drawings in typical Brom style and quality.
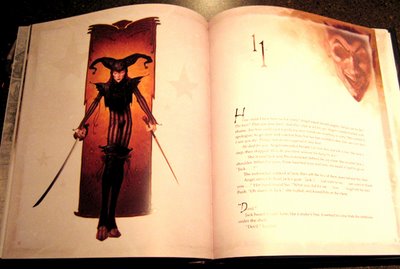
I work in the games industry and got a chance to meet Brom last year as he'd been comissioned to do some work for our studio and was visiting. It was really refreshing to learn that his ego does not match his ninja like skill with a brush. Meaning he was a really friendly guy with not an ounce of "big-head-itis" We had a very animated conversation around creating art and the inspiration one gains from experiencing another persons creations, among other things. It would have been great to spend a bit more time chatting as he is a very inspiring person when on the subject of art and fantasy. Did I ever mention I'm a complete fanboy? I happily regressed to fanboy mode complete with book and big fat signature making sharpie.
If you've never heard of Brom and you'd like to come out from the rock you've been hiding under for the past....forever! Go check out www.bromart.com and get yourself some inspiration!
Keep Creating!
~The Art Ninja..
"Brom" as he is known in the fantasy art world has been creating really awesome works of art as far back as I can remember. He really got his kick in the industry when he started painting for TSR back in the day.
The book I received is called "The Plucker" It's an illustrated novel. Hardcover (first printing) 145 pages of fantastic story (ie: fantasy but not dragons and orks style fantasy) Filled with awesome paintings and drawings in typical Brom style and quality.

I work in the games industry and got a chance to meet Brom last year as he'd been comissioned to do some work for our studio and was visiting. It was really refreshing to learn that his ego does not match his ninja like skill with a brush. Meaning he was a really friendly guy with not an ounce of "big-head-itis" We had a very animated conversation around creating art and the inspiration one gains from experiencing another persons creations, among other things. It would have been great to spend a bit more time chatting as he is a very inspiring person when on the subject of art and fantasy. Did I ever mention I'm a complete fanboy? I happily regressed to fanboy mode complete with book and big fat signature making sharpie.
If you've never heard of Brom and you'd like to come out from the rock you've been hiding under for the past....forever! Go check out www.bromart.com and get yourself some inspiration!
Keep Creating!
~The Art Ninja..
Sunday, August 13, 2006
The Art Ninja?!? or Art Ninja?
Hey there, just a quick "what tha?"
During my covert Ninja exploits I discovered another Art Ninja! It was inevitable that I'd run into another one sooner or later! Apparently there is an Art Ninja aside from myself in this virtual world. Just to keep things totally clear, I am "The Art Ninja", he is "Art Ninja". We have yet to stumble across each other in the bows of a huge maple in the dark on the job. We are ninja after all, if it was dark we wouldn't be able to see each other anyway.
~Keep Creating~
The Art Ninja.
Sunday, July 16, 2006
Saltspring Island, Artist Mecca?
A week ago today, my better half and I went to Saltspring Island. It's an island off the southern coast of British Columbia. Saltspring Island is known for it's Saturday Artists market. There are a total of 42 resident artists scattered around the island creating various works of art. You can also drive around the island and visit the artists studios most days fo the week. Painting, jewelery, potter, weavings, etc etc.. the list goes on. There was even a guy making rose petal beads. The term Rosary came from the fact that the beads were made from boiled down rose petals, formed and baked into fragrant beads. Very cool. The ultimate form of recycling. In addition to the art culture on the island, there's a huge hippy vibe going on there. Many of the current older residents "floated" over to the island in the 70's and now their kids are making the 3rd generation of hippies! I'm not saying that EVERYONE on the island is a hippy, from what we experienced when we visited, I'd say it's a good 60/40 split hippy/non-hippy types with maybe 10% of the 60% the John and Yoko type or "hard core hippy". Ah Hippy's... They're an interesting bunch. Don't get me wrong, I have nothing wrong with the Hippy lifestyle, it's just not for me. Which is somewhat ironic as I tend to slant towards the whole buddist, zen way of looking at life and that's where the whole hippy trend came from. Understanding, going with the flow, detachment, balance etc. It's very much zen. I'm a pretty laid back guy but I don't believe for a second that life should be without drive or purpose. Which brings me to my second topic...Hard to say weither the artists on the island are making the kind of money I'd want to make as a full-time self-employeed artist. The island seemd pretty isolated. Maybe when I'm 80 I'll want something more laid back but not that laid back. I think some of them are bringing in good denaro but sales on the island are mostly in the tourist season. Stuckup rich Americans (no, you're not one of them so don't take offence if you're from south of the boarder. K?) are now moving to the island and driving the prices up so high that it's not reasonable to think you can purchase a piece of property there and expect to make the mortgage payments with the amount of income you'd make as an "Island artist" There's got to be more.
~ Keep Creating ~
The Art Ninja.
~ Keep Creating ~
The Art Ninja.
Monday, July 03, 2006
Canada Day and doodads.
Hey there, it's holiday Monday, 2 days after Canada Day. Happy "day off" I don't know if many people know or really care why it's a national holiday, only that it's a day off of work. Can you imagine what it would be like if EVERY day was a day off? I mean, imagine you're doing something that you really love doing, it doesn't interfere with laundry, relaxation, workin' on "the house" or whatever you do for fun. If you're an artist-type, imagine creating Art every day and enjoying it. Wow what a perfect world. The only way to get there is to think about it every day. Think about what you want as if you already have it. I'm not talking "big screen tv...big screen tv..." That's just a doodad. It'll just get you further into debt and what'll you have to show for it...a piece of electronic equipment that is obsolete the moment you step out of the store you bought it from. Everyone's trying to sell you that piece of comfort and you'll never find it looking for it in a doodad. I'm talking major life altering thinking... "I'm a successful artist and I spend much of my spare time learning, enjoying and growing as an artist" (That's where I'm headed. You may have a different path) It's cool to get the occasional doodad as long as it doesn't distract you from your true path.
Peace and Balance ~ The Art Ninja ~
Peace and Balance ~ The Art Ninja ~
Sunday, July 02, 2006
Drawings and such...
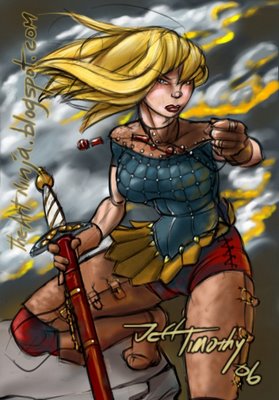 Art? Here's some. I've been sculpting on and off for a number of years and having recently completed and cast a bust I've been working on for a while (Here)
I sat down to design my next figure. The picture here is the result of that effort! The full image is a standing pose, but I'll have to sculpt the stone as the feet are planted on different levels.
If I actually make time to start sculpting it I think it'll look pretty sweet once it's done.
I wanted her eyes to express her resolve. By staring right at the viewer we get a sense of the characters strength. No wishy-washy look off to the horizon. She means business and you shouldn't mess with her.
peace and balance ~ The Art Ninja ~
Saturday, July 01, 2006
Ninja's in books.
I just read a book that was not bad considering the price.
It's a really easy read, has action, mystery, some horror and fantasy all thrown in. Oh and best of all, Ninjas.
I rarely read books that take place in contemporary settings as I've always been partial to Fantasy, but for just over 4 bucks I can't complain. BTW, that site, bookcloseouts.com I've been buying books from them for years. Discovered them in St.Catherines Ontario. (lived close by for a few years while my wife and I struggled to get our break in the CG business.)
We now live 3000 km away from there but I still order stuff from them occasionally. I'm a sucker for a good deal on books. They occasionally have great deals on Art Books too!
The Art Of Arrow Cutting by Stephen Dedman.
It's a really easy read, has action, mystery, some horror and fantasy all thrown in. Oh and best of all, Ninjas.
I rarely read books that take place in contemporary settings as I've always been partial to Fantasy, but for just over 4 bucks I can't complain. BTW, that site, bookcloseouts.com I've been buying books from them for years. Discovered them in St.Catherines Ontario. (lived close by for a few years while my wife and I struggled to get our break in the CG business.)
We now live 3000 km away from there but I still order stuff from them occasionally. I'm a sucker for a good deal on books. They occasionally have great deals on Art Books too!
The Chronicle begins
Art and Ninjas. Two things I've always been fond of. I just happened to make Art my full time career. Not Ninjas. At one time I would have thought being a Ninja full time and getting paid for it would have been very cool work. Alas, I've grown accustom to not having Shuriken thrown at me and I really have no need for climbing claws. Leave that to the Parkor guys.
I'd take drawing over fighting samurai any day... of course fighting samurai does sound alot more adventurous but art lasts longer and can induce wonder in people. While being hit by a shuriken would just hurt really really bad.
peace and balance. ~ the art ninja ~
I'd take drawing over fighting samurai any day... of course fighting samurai does sound alot more adventurous but art lasts longer and can induce wonder in people. While being hit by a shuriken would just hurt really really bad.
peace and balance. ~ the art ninja ~
Subscribe to:
Comments (Atom)
