Ah yes, comment spam. Don't you love it... It's interesting how Karma works, it's the great equalizer. Comment spammers will reap what they sow.
Nothing new on the art front. Just me typing. Have a great weekend!
~theartninja
Sunday, April 04, 2010
Friday, April 02, 2010
Lots can happen in 3 years!
Wow, three years gone by...
When I have some new art related news to talk about I'll post it here!
~Jeff.
"Keepin' the blog alive in 2010!"
When I have some new art related news to talk about I'll post it here!
~Jeff.
"Keepin' the blog alive in 2010!"
Friday, November 23, 2007
Dec 5th is Day of the Ninja!!
Thanks, and happy sneaking.
~the art ninja

Sunday, May 13, 2007
New art and new ideas...
Another quick post, I was sitting at home the other day thinking of how I could create something interesting that other people would be willing to pay money for, because let's face it, it's nice to be artistic for art's sake but unless you can actually make a living from it, it'll always take a back seat to your job. How can you truly devote your life to an artistic pursuit if you are always worrying about money?
While pondering this life altering question an idea popped into my head. Go over to my Cafepress shop and see what I came up with. I love it!. (If you know my style of humour then you would understand.)
http://www.cafepress.com/certifiedorg
I've come to the conclusion that art isn't necessairly just about creating fancy images. It's also about manifesting ideas. Without the idea, the image has less meaning. Develop your creativity and your ideas, your talent will catch up...
~peace and balance.
~theartninja
Wednesday, May 09, 2007
New POST!
Ok, I'm tired of looking at December the 17th 2006 on my last blog entry. So I'm going to blog about absoutely nothing today just to change the date.
Slaves to technology....
Cheers!
~TheArtNinja.
Slaves to technology....
Cheers!
~TheArtNinja.
Sunday, December 17, 2006
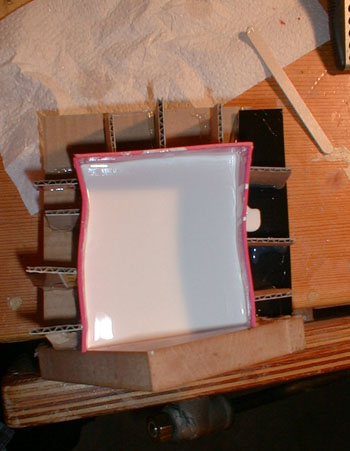
Light Box
Here's a quick post...
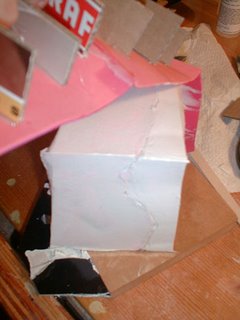
In the previous post I mention the Light Box I used to shoot pictures of my latest sculpture.
It was really easy to make, only required a bit of planning and materials.
White Corregated plastic for the walls, picked up at the local hardware store.
Rice paper for the side windows. (I used what I had on hand which was chinese calligraphy paper, which I will most definitely blog about later on....;) Just taped over square opening cut in the side walls.
The lights were inexpensive construction style lights also picked up at hardware stores. Shouldn't cost you more than about 15 bucks each.(Can$) Try princess auto, they have sales periodically...
Just taped together with clear packaging tape. (use clear, as opaque will show as dark spots on the inside of the box.)

IMPORTANT. the lights are EXTREMELY HOT I turn them off if I leave the room, and keep them AWAY from the PLASTIC and RICE PAPER. DUH! If you make a light box don't burn your house down ok?
Why is it so big? So I can photograph lots of different things in it. As it's just shy of 2 x 2 feet square, it makes my sculpture look tiny! Trust me, the sculpture isn't tiny, the dimensions are shown in my last post.
Cheers!
Peace and Balance
~ the art ninja ~
Jenna, the Resin Cast.

I've finally gotten a chance to build a light box for shooting photos of my Sculpture ~ Jenna ~
Here's the Final Sculpture.
This sculpture has been cast with a black tint added to the resin before it's mixed, this causes it to turn out grey when the resin kicks.
(kicks = the chemical reaction starts causing the molecules to change from liquid to solid. It also turns white, and it happens very fast, hence the term "kick")
I think I prefer casting the figure in white. I wanted to try the grey too see how it turned out.

 In the two side profile shots you can see the seam line on the figure. It's actually fairly thin, with a small amount of flash showing. (flash = thin amounts of a casting's material that has seeped into the parting seam between the two mold halves. )
Cleanup recommendations:
A good small file for filing down any abnormalities in the seam line.
Some 400 or 800 grit sandpaper. (sanding wet works wonders too)
I like to use a dremel to clean up the base but you don't necessairly need one, some elbow grease and an exacto knife will work. Make sure you cut AWAY from yourself, your hands, your fingers. You WILL jab yourself WHEN you slip. That's not an IF it's a WHEN. (Take my advice on this one... I've jabbed myself too many times to not insist you follow my advice!)
Dimensions:
The figure measures approximately 5.3cm x 9cm x 5.5cm OR 3.75" x 2.5" x 2.25"
Painting:
For wonderful instruction on painting figures and various painting techniques, go to any Games Workshop store in person. They always have people willing to help you get started and you can also pick up supplies there. (a bit more expensive then some other places but it's all in one place)
Also try a google search for miniature painting. You'll find a tonne of advice. I plan on putting up a painted copy of the figure in the future so you can see one solution to the painting question...
do something creative!
~the art ninja~
Monday, October 02, 2006
The Making of Jenna - Building the Mold.
In a previous post... drawings-and-such I'd mentioned another sculpture...This is that other sculpture...
Here's my official CYA statement. Before you do anything at all with RTV Silicone, Casting Resin or any other hazardous chemicals be damn sure you have the correct protection and follow the correct safety procedures while handling the material. All chemicals you buy should have available safety precaution data sheets. I'd suggest reading them thoroughly and don't dare deviate from the recommendations. Playing roulette with your health isn't a good idea. Don't blame me if you splash casting resin in your eye and it hardens before you can say boo. I always work with protective goggles, full respirator, lots of paper towels on hand and a new pair of latex gloves. Don't get lazy and don't try to save a buck by cutting back on protective gear. If you seriously want to get into casting, you're going to be spending a few hundred bucks at least to get the proper equipment and RTV silicone will run you about 30 bucks for half a litre. (there's over one litre in the mold below)
Welcome to the making of "Jenna"
Jenna is the name I gave to the sculpture you'll see below in this step by step mold making process. If you're interested in sculpting and casting, this step-by-step will give you a great headstart on one way to go about it. When I created the mold for Jenna, I had already had the experience of using RTV silicone many times before. I've also got 3+ years of casting research under my belt. I'd suggest that my process here is not the final be all and end all of mold creation as you will need to do your own research and find out all you can before you start. Then once you've answered all your own questions you should try casting something you're not too attached to as a test. No amount of reading will take the place of honest-to-goodness experience. You're gonna break a few eggs before you're able to make a good omelet...as they say. Just don't rush it and break you're prize dodo bird eggs before you know what you're doing.
Well, This should really be called "The Casting of Jenna" As I didn't take any progress shots of the sculpting process on this one. (I promise I will take great in sculpting progress shots of the next one...)
Making the mold.
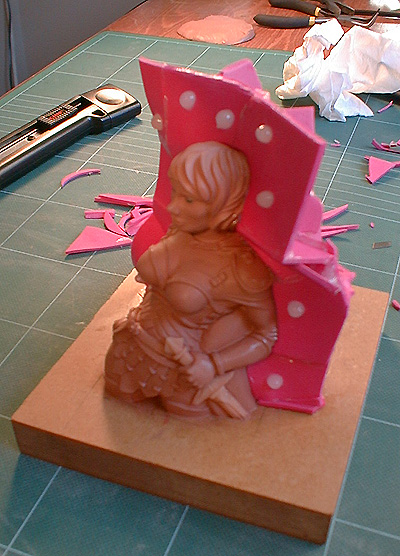
 In this shot you'll see the first half mold support structure which I built from sheets of craft foam. The back is built up using a hotglue gun, and slowly but surely, pieces of foam have been added to completely isolate one half of the sculpture. I've placed glue pips on the side which will create keys to hold the mold halves together better. You'll see what I mean later on. In order to completely seal the parting line edge to prevent the mold material from leaking through to the back, when the support walls are complete I then carefully painted a layer of vaseline along the edge to plug up all the holes.
 I've added the two side walls, Only the top wall to be attached then pouring starts below...
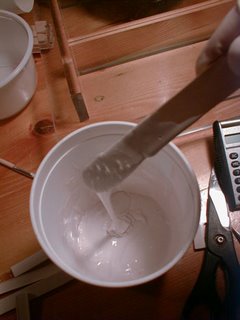 After the support structure is built to isolate half of the sculpture, I mix up a batch of RTV silicone. Catalyst is poured into the liquid RTV which will cause the silicone to set within 24 hours. Mixing introduces lots of air into the silicone as you can see from the image. After it is mixed thoroughly...
...I place the RTV into a vacuum chamber. Vacuuming it pulls the air bubbles out of the mixture leaving a clean and bubble-free batch of silicone ready for careful pouring.

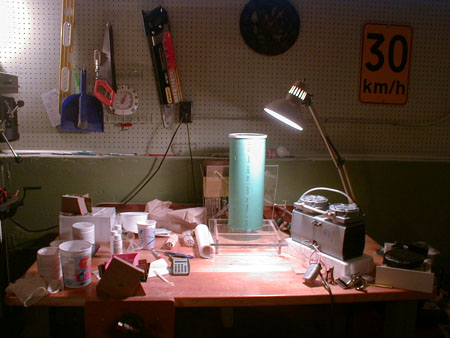
The Casting Station.
This is where I do all my casting. On a big table in a space that can get messy. In a well ventelated garage (I still use the respirator). See the road speed sign on the side? When casting, I follow it.... Work slowly and carefully and you'll screw up much less and save money. Vacuum chambe in the centre, vacuum pump to the right of that.
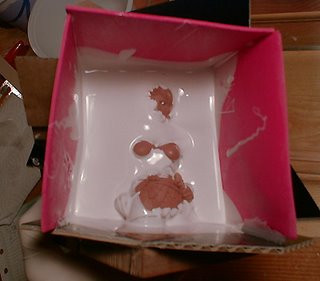
 I poured the first half of the mold in 2 stages. This first pour was done this way so that I could get a thin layer of silicone to seal any gaps which I might have missed along the edge of the figure. Even so, I discovered after that there was in-fact a thin gap through which silicone leaked. If I had poured the entire side at once, I would have lost a lot of silicone through that gap. The mold was left to set for 24 hours at this stage.
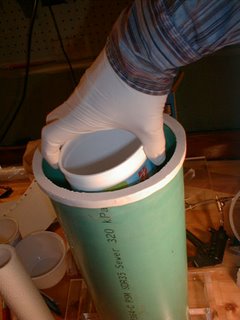
 This shows the second stage of the First pour. In order to avoid trapping air against the various surfaces of the sculpture, I pour the silicon into one corner of the foam "box" and allow it to VERY SLOWLY flow over the surface of the sculpture. If I was to carelessly just dump the whole batch of RTV into the box it would trap air which I do not want to happen.
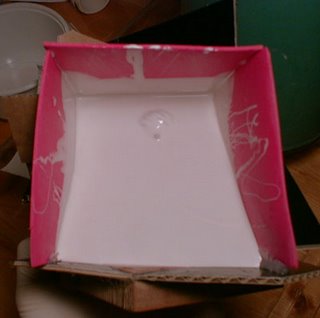 The First pour almost finished. The entire sculpture is now covered. I added more silicone after this shot to make sure that the final mold would be thick enough to hold its shape when casting.
 After the silicone sets for 24 hours I pull off the finely crafted foam "box" taking care not to damage the sculpture or cause the RTV to come away from the figure. I need it to stay exactly where it is in order to build the second half of the mold.
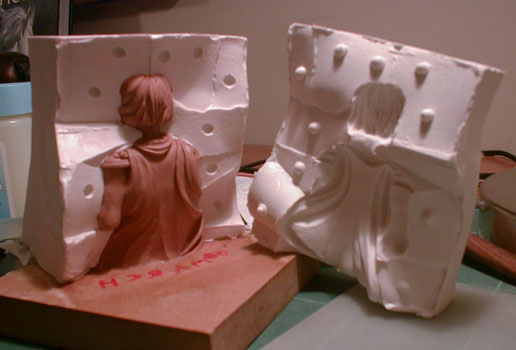
 Here's the cleaned half mold...You can see the divots created by the hotglue pips added at the beginning.
 Fast forward a bit...I've built the walls for the second half of the mold. Reinforced with cardboard to keep it from coming away from the completed sides.
The most important step... I applied vaseline to the entire exposed surface of silicone. If this step is forgotten, the new silicone will CHEMICALLY BOND with the first side and you'll have a big block of silicone that you can't pull apart. That's bad. Very bad.
All set to pour.
I mixed up a new batch of RTV for this side going through the same vacuuming and pouring process as for the first side.
 Here's the final pour. Time to wait another 24 hours...
 After it's set, the box comes a way easily. We're left with a solid block with parting line along the side.

The cleaned up and completed mold with sculpture embedded inside.
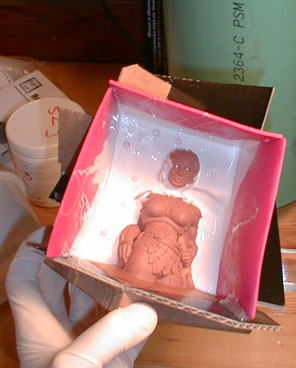
 The moment of truth. The mold opened. The sides came away easily (because of the vaseline used as mold release) Looks clean, no bubbles and the sculpture looks to be intact!
 Carefully I pulled the front half of the mold off the sculpture. The silicone is extremely flexible and is great for casting sculptures with undercuts. It comes away without much complaining.
 Here it is, the final shot. Clean mold ready for casting and an undamaged clay sculpture ready to be used to make a new mold if need be!
Hope you learned something.... about casting today!
Here's what it took me to to get to this point:
6 days of constructing, pouring and waiting!
3 years of research, buying equipment, building, testing and learning!
50 hours of sculpting!
Peace and Balance - and happy casting!
~The Art Ninja~
"You don't have to be great to get started, you do have to start to become great"
Here's my official CYA statement. Before you do anything at all with RTV Silicone, Casting Resin or any other hazardous chemicals be damn sure you have the correct protection and follow the correct safety procedures while handling the material. All chemicals you buy should have available safety precaution data sheets. I'd suggest reading them thoroughly and don't dare deviate from the recommendations. Playing roulette with your health isn't a good idea. Don't blame me if you splash casting resin in your eye and it hardens before you can say boo. I always work with protective goggles, full respirator, lots of paper towels on hand and a new pair of latex gloves. Don't get lazy and don't try to save a buck by cutting back on protective gear. If you seriously want to get into casting, you're going to be spending a few hundred bucks at least to get the proper equipment and RTV silicone will run you about 30 bucks for half a litre. (there's over one litre in the mold below)
Welcome to the making of "Jenna"
Jenna is the name I gave to the sculpture you'll see below in this step by step mold making process. If you're interested in sculpting and casting, this step-by-step will give you a great headstart on one way to go about it. When I created the mold for Jenna, I had already had the experience of using RTV silicone many times before. I've also got 3+ years of casting research under my belt. I'd suggest that my process here is not the final be all and end all of mold creation as you will need to do your own research and find out all you can before you start. Then once you've answered all your own questions you should try casting something you're not too attached to as a test. No amount of reading will take the place of honest-to-goodness experience. You're gonna break a few eggs before you're able to make a good omelet...as they say. Just don't rush it and break you're prize dodo bird eggs before you know what you're doing.
Well, This should really be called "The Casting of Jenna" As I didn't take any progress shots of the sculpting process on this one. (I promise I will take great in sculpting progress shots of the next one...)
Making the mold.
 In this shot you'll see the first half mold support structure which I built from sheets of craft foam. The back is built up using a hotglue gun, and slowly but surely, pieces of foam have been added to completely isolate one half of the sculpture. I've placed glue pips on the side which will create keys to hold the mold halves together better. You'll see what I mean later on. In order to completely seal the parting line edge to prevent the mold material from leaking through to the back, when the support walls are complete I then carefully painted a layer of vaseline along the edge to plug up all the holes.
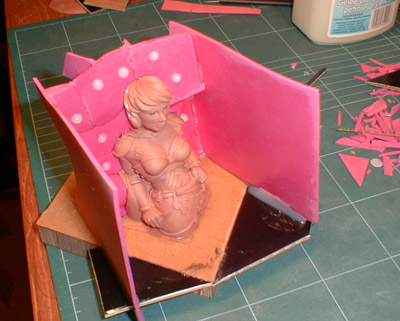 I've added the two side walls, Only the top wall to be attached then pouring starts below...
 After the support structure is built to isolate half of the sculpture, I mix up a batch of RTV silicone. Catalyst is poured into the liquid RTV which will cause the silicone to set within 24 hours. Mixing introduces lots of air into the silicone as you can see from the image. After it is mixed thoroughly...
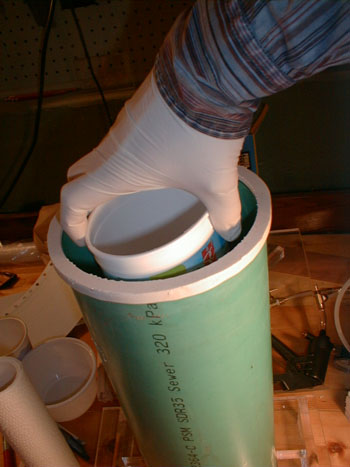
...I place the RTV into a vacuum chamber. Vacuuming it pulls the air bubbles out of the mixture leaving a clean and bubble-free batch of silicone ready for careful pouring.
The Casting Station.
This is where I do all my casting. On a big table in a space that can get messy. In a well ventelated garage (I still use the respirator). See the road speed sign on the side? When casting, I follow it.... Work slowly and carefully and you'll screw up much less and save money. Vacuum chambe in the centre, vacuum pump to the right of that.
 I poured the first half of the mold in 2 stages. This first pour was done this way so that I could get a thin layer of silicone to seal any gaps which I might have missed along the edge of the figure. Even so, I discovered after that there was in-fact a thin gap through which silicone leaked. If I had poured the entire side at once, I would have lost a lot of silicone through that gap. The mold was left to set for 24 hours at this stage.
 This shows the second stage of the First pour. In order to avoid trapping air against the various surfaces of the sculpture, I pour the silicon into one corner of the foam "box" and allow it to VERY SLOWLY flow over the surface of the sculpture. If I was to carelessly just dump the whole batch of RTV into the box it would trap air which I do not want to happen.
 The First pour almost finished. The entire sculpture is now covered. I added more silicone after this shot to make sure that the final mold would be thick enough to hold its shape when casting.
 After the silicone sets for 24 hours I pull off the finely crafted foam "box" taking care not to damage the sculpture or cause the RTV to come away from the figure. I need it to stay exactly where it is in order to build the second half of the mold.
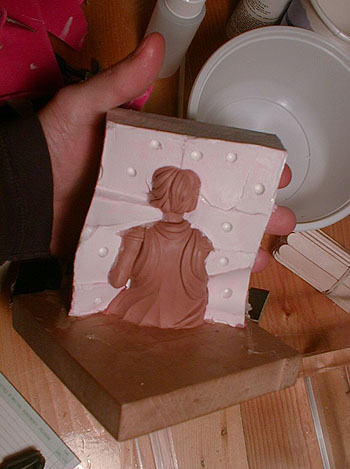 Here's the cleaned half mold...You can see the divots created by the hotglue pips added at the beginning.
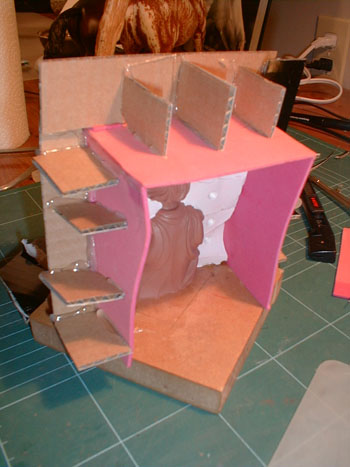 Fast forward a bit...I've built the walls for the second half of the mold. Reinforced with cardboard to keep it from coming away from the completed sides.
The most important step... I applied vaseline to the entire exposed surface of silicone. If this step is forgotten, the new silicone will CHEMICALLY BOND with the first side and you'll have a big block of silicone that you can't pull apart. That's bad. Very bad.
All set to pour.
I mixed up a new batch of RTV for this side going through the same vacuuming and pouring process as for the first side.
 Here's the final pour. Time to wait another 24 hours...
 After it's set, the box comes a way easily. We're left with a solid block with parting line along the side.
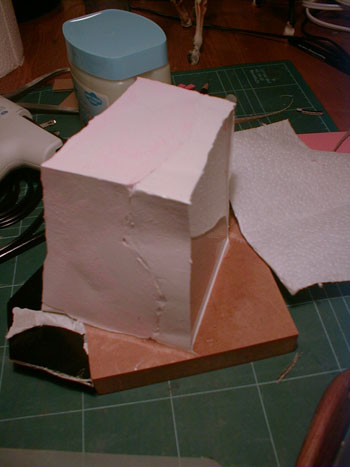
The cleaned up and completed mold with sculpture embedded inside.
 The moment of truth. The mold opened. The sides came away easily (because of the vaseline used as mold release) Looks clean, no bubbles and the sculpture looks to be intact!
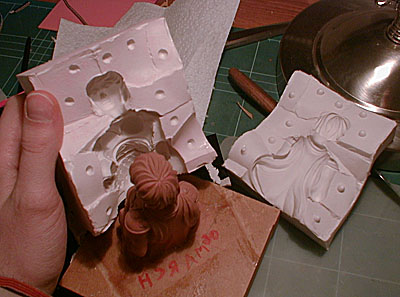 Carefully I pulled the front half of the mold off the sculpture. The silicone is extremely flexible and is great for casting sculptures with undercuts. It comes away without much complaining.
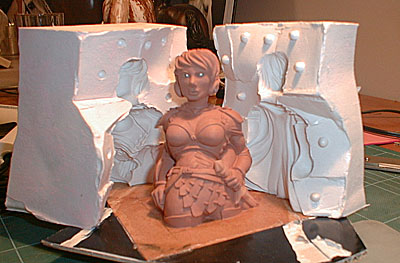 Here it is, the final shot. Clean mold ready for casting and an undamaged clay sculpture ready to be used to make a new mold if need be!
Hope you learned something.... about casting today!
Here's what it took me to to get to this point:
6 days of constructing, pouring and waiting!
3 years of research, buying equipment, building, testing and learning!
50 hours of sculpting!
Peace and Balance - and happy casting!
~The Art Ninja~
"You don't have to be great to get started, you do have to start to become great"
Subscribe to:
Posts (Atom)